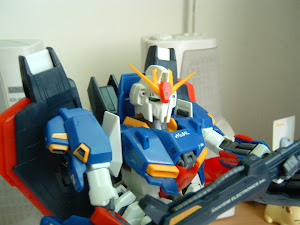
Detailing your model really improves its realism. This page explains some of the methods that you can use to detail your model. Among all the detailing methods, detailing with a pen is the most popular method. It also requires a lot of patience and a really steady hand.
Inking Panel Lines
You can improve the realism of your model by inking some or most of the panel lines. You can use the documentation or box art that came with your model as a guide. Or you can just ink the models according to your liking. Here are some recommendations for pens and pigment liners (click on the picture). First, you want a pen that has a very small tip, I do mean small. The pens I recommend are a Sakura Microperm .01 and a Staedtler pigment liner .005. These pens are great for creating panel lines. The Sakura Microperm is great for plastic because it marks plastic permanently. If you make a mistake with this pen, it is recommended that you erase the mistake with a little rubbing alcohol immediately. As for the Staedtler pigment liner, you can use the rubbing alcohol or your finger to erase the mistake. Note, the Staedtler pigment liner takes a while to dry on plastic and can cause smudging if you accidentally rub your finger on it. If you can't get any of these pens, you can stop by your local art store and look for similar items.
The objective for inking is simple, all you want to do is ink the panel lines. I recommend that you ink your model one appendage at a time. That is, you want to detail an arm or a leg before your model is put together. You could ink parts of the model while on the tree, however, you might still have to ink panel lines after assembly. All you want to do is pass the pen along the panel lines you want to ink. Since most panel lines an indented on the model, it would be easy. However, there are some panel lines that are not so indented and will require a very steady hand. If you make a mistake, you'll have to be careful to erase only the mistake you made and not the rest of work you already completed.
Painting Small Details
There are may be some little details on your model that your pigment liner can't detail. That's where paints come into play. Little details like gun turrets and vulcan cannons on the head of a Gundam model might need a little touch up paint. All you need to use is a small paint brush. Note, the smaller the paint brushes tip, the harder it is to control. In case you need to get finer details, like the eyes on the 1/144th scale Tallgeese III, you could use a toothpick (replacing the paint brush). Yes, I did say a toothpick. I used a toothpick and green paint to detail the Tallgeese III's eyes. The toothpick is very precise because of its not so sharpened end. Unlike the paint brush, it has a hard end. If you use the paint brush to detail, you'll need to be precise. I recommend that you paint your details before you put your model together. You could paint it while it is still on the frame, giving you more control on how you paint. Or, you can paint the model when the specific part is assembled. You can determine which method is easy to handle. I prefer painting on the tree, which gives a lot more control.
Decals
Your model may come with decals, either a sticker sheet or dry transfer sheet; depending on the gundam kit you bought. I usually don't like using a sticker sheet and prefer painting on the details. However, if you feel that you cannot paint details follow these few steps. First, make sure that the surface you placing your decals on are clean. Use a mild soap water mixture to clean the surface. The objective is to prevent grease between the surface and the sticker contact. Second, you can use a pair of tweezers to help align the sticker on the surface or until it is aligned properly. Do not use your fingers, it could put grease on the sticker contact and reduce the sticker's effectiveness to stick to the surface. Third, when the sticker on the surface, press firmly to ensure good contact. For dry transfers, it's a little trickier. Make sure the surface is clean. Place the dry transfer sheet on the surface or on the position you want; then rub firmly on the specific decal. If a piece of the decal remains on the transfer sheet, don't panic. Simply place the transfer sheet back on the surface and re-align your work and continue to rub the decal into place. When finished, your decals should make your model look realistic.